Sunday, October 20, 2013

Acorn Squash Slices

Shannon, this is for you. I hope you can have brown sugar. Maybe you need to send me a list of foods you can have. 
Anyway, I bought an acorn squash for God knows what reason. It just felt right.
Then I did my usual "let this thing sit in the fridge forever" trick. It really inspires me to get creative. 
I cut the squash in half, gutted it, then sliced it.

Next, I realized that my cookie sheet was at school, so I put all of the slices in a ziplock bag. Guess how many days it took me to remember to bring the pan home..... 3. Luckily, there was no mold growing, and so far I'm not sick. I think we're in the clear. 
So, I tossed in some olive oil and brown sugar and shook it around in the bag. 
My oven was already at 400 degrees from making corn bread muffins (substitute coconut dream for milk and you'll never use cows' milk again). Lay the squash flat on the cookie sheet and cook for 5 minutes. Take a fork and turn over the pieces. Cook for about 15 more minutes.
I actually totally forgot about them and I think they were in there for more like 20-25, so they are a little more soft, and the pan was harder to clean because brown sugar and olive oil make black tar that requires a copper scrubber to remove. 
So, don't do that. Set a timer.
But, delicious either way!

Pressure Cooker Experiment aka everything is broken and I can't tell the difference between pork and beef

So, I went to visit my 97 year old Grandma the other week.  I affectionately refer to her as Mum. Mum, in her old age, does not give a shit.  She tells it like it is.  I walked in to her apartment at Bayview Manor to "Your purse is huge.  Go get one out of my closet.  Why do you need a purse that big? I never used a purse that size.  I'm sure that there is one in the glory hole that you can have." The "glory hole" is what she calls her walk in closet that I have to go through about every two years and eliminate all of the empty cookie tins and other weird stuff that she saves, like boxes with no lids.

Anyway, I left with a purse, a tin of cookies, and a pressure cooker.  After asking other people what to do with it, and Googling directions, today I dove in to pressure cooking.  It's weird.


So, first of all, I got confused.  I had a cut of beef that the guy at the store said would be good for pot roast and I also had some pork shoulder.  The pork shoulder ended up in the pressure cooker.  My bad.

What you need:
A pressure cooker (this one is electric)
3lbs of beef roast (chuck roast apparently is good)
salt, pepper, and garlic powder mixed together (enough to rub on the roast)
beef broth (a can)
3-4 carrots, peeled and cut into bite sized pieces
2 sweet potatoes cut into bite sized pieces
2 onions (small sized, or 1 big one) cut into quarters
1.5 tbsp. Worcestershire sauce


So, first, put on an apron.  I would also advise investing in some good tongs.  Mine suck, and I ended up grabbing a hot slab of meat with my hands.
Turn the pressure cooker dial to about 300 and heat up some vegetable oil in it (about 2tbsp.)
Brown the roast on all sides.  This was when I started to swear and grab random utensils in an attempt to flip the 3lb slab of raw meat, almost dropped it, and then grabbed it with my hands. Nothing like blood all over your hands and counter.
Don't give up though, you have a pile of raw meat waiting for you.  Once the meat is browned, rub the salt, pepper, garlic powder mixture on it.  Then, pour in the beef broth and the Worcestershire sauce and add in the onions.
Now, you get to figure out how to close the lid of the cooker.  Right tighty would be your first guess.  WRONG.  It goes left, of course! HAHAHAHA.
Now you are going to "bring it up to pressure".  I'm not sure what that means.  I turned up the heat to high, and put on the little screw top thing, which was broken.  So, steam was escaping the entire time. Thanks Mum!  I was not discouraged by this discovery and just continued on.
After 30 minutes, I "released the pressure the quick way."  I think that if I had a fully functioning pressure cooker, I would have removed the little cap.  Since mine was broken, I just opened it up.  I tossed in the carrots and sweet potatoes, closed it back up.
I then let it cook for another 15 minutes.
When I "released the pressure the quick way" again, I realized that I had put the pork shoulder in because the meat was very white.  I've talked about my relationship with pork before...I'm scared of it being raw. So, I got out my trusty meat thermometer to make sure it was done. Nothing.  Broken. yep.
So, I took the pork and veggies out of the pressure cooker, and cut that bad boy up.  It was looking a little pink, so I tossed it in the oven for 10 minutes at 350.  Done and done. It's delicious.

Saturday, October 12, 2013

How to not look like a whore in red lipstick

I think I'm pretty good at wearing red lipstick. I'll work on being humble tomorrow.
Here are some examples: 

Red lipstick is easy if you have the right tools and apply it correctly. Also, you need to find a red that is good for you. I like matte reds and my two favorites are Ruby Woo and Russian Red by MAC. 
To do red right you need:
Lip liner (I use MAC Cherry)
Lip primer
Lipstick brush (thin angled brush) 
Lipstick
Here is a photo collage of the steps followed by instructions: 

So, first exfoliate your lip by gently brushing it with your toothbrush. Next apply your lip primer. 
If you look closely, you can see the scar on my face from being savagely attacked by a cat at the age of 12.  It scabbed over and I looked like a freak for about a month with my "half stache." Middle school is a cruel, cruel place. I'm sure my floral MC Hammer pants didn't help.
Anywho. Next, apply the lip liner. Make sure it is sharpened. If not you won't get a crisp outline. 
Now, take your brush and fill in your lip with the lipstick. I only use the tube directly on my lip when reapplying because it's much quicker. Applying with a brush lasts longer. I usually only need to reapply because I was eating a burrito. 
Go figure. 
Now, go out and wear red lipstick! You will immediately feel 10x hotter.

Cilantro Lime Brown Rice

I did it! After three different versions I think I figured it out.  I have recreated the Chipotle Cilantro Lime Rice!
So you will need:
1 tbsp. oil
2 cloves of garlic (minced)
some salt
1 cup brown rice
2 cups of chicken broth (or if you are a veg head, vegetable broth)
juice of about 1 lime
1/3 cilantro (chopped)

So, take the garlic, rice, some salt and pepper and toss it in a pan with the oil.  Mix that stuff around for about 2-3 minutes, until the rice is starting to look a little translucent.  Next, add the broth and lime juice and pinch of salt.  Bring all of this to a boil.  Cover before you turn it down to low.  Set a timer for 40 minutes.
I use this time to check what's going on in the world, or Facebook stalk.  Maybe you could paint your nails, or take a shower.
Come back in 40 minutes and remove the rice from the stove.  Fluff that stuff up with a fork, mix in the cilantro and dig in.
It's not as good reheated, so invite over some friends to eat with you, or just consume an ungodly amount of rice.  Or cut the recipe in half.

Here is how the recipe looks on my fridge:
photo.JPG
Again, you're welcome.

Friday, October 4, 2013

Printing on Fabric

I've been stenciling for quite a few years. Mostly because I'm too lazy to learn how to screen print, and partially because you really have to use your brain to do it. And we all know there is nothing more satisfying than using your brain, then getting to tell everyone how smart you are.
I will pass on my tips, techniques, and info here. Do with it what you will.
I use overhead projector sheets to make my stencils and I use an exacto knife. You'll also need screen printing paint and a roller or paint brush.
Start by thinking about your design. 
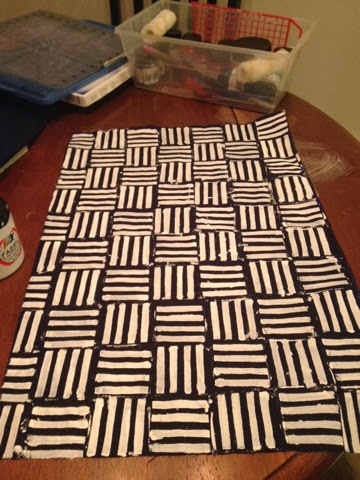
This is what I decided on. Next, get a sharpie and your overhead projector sheet. Draw the design on to it. Remember that what you cut out becomes ink and what you leave will be the fabric you are printing on to. This is the tricky part for those of us with poor executive functioning. Take your time. I like to go super slow and do random things in between like go to Target and buy a new vacuum, or reapply my makeup (favorite time wasting activity). 
Look at that!
Now, you get to start the fun part...
Decide if you are going to use a roller or a paint brush. If you roll, you get more crisp lines and even paint, and you get to say cool things like "oh I'm just rolling out this stencil, then I'll be right over." If you use a brush you can get more precise shapes and you don't have to worry about extra paint at the edges of your stencil. Your choice, I could care less what you do. 
Now, position your stencil and use your method of choice (I did both for this project).
Don't use the paint directly out of the container, use a leftover babyshower plate. Sometimes you might want to add a little water to the paint. Don't add too much or it will bleed out and ruin the crisp details of your stencil.
When you are done let it dry completely (or use a hair dryer to speed up the process because obviously, waiting is for losers). 
When it is dry, use a piece of shit towel and lay it on top of the fabric with the paint side up. Turn your iron (that you "inherited" from your first college roommate) to the highest setting. Iron the entire surface, holding the iron in place for a ten count before moving to the next space. I kinda do this half assed and have never had an issue, but I'm trying this new thing called following directions.

Now, you've got some cool fabric!

Thursday, October 3, 2013

Sauted Apples and Balsamic Pork

So, this month I decided that I would have a budget and do the "envelope" method.  So, if you get the great joy of hanging out with me this month, please excuse me as I dig through my bag and try to take cash out of the appropriately labeled white envelope.
photo.JPG

 Anyway, this endeavor made me really think about buying food.  I eat out a lot, and I throw away a ton of food too.  It's actually pretty horrible.  I buy groceries and then I am too lazy to make anything with them and end up eating a burrito instead.  So, I made a nice little grocery list, and I have been cooking up some gems!  I spent $75 on food that I am hoping will last two weeks.  So far I am almost one week in and I already have almost a week of leftovers freezing! It's like I'm a regular budgeting house wife or something.
anyway, here is a recipe that I made up for the pork chops that I bought.  As always, if there isn't a measurement...just toss it in.

You need:
Two pork chops
balsamic vinegar
butter
an apple thinly sliced
salt and pepper

So, put about 2 tbsp. of butter in a pan and melt it.  Add the apples and sauté until softened.
photo 1.JPG
Place your two pork chops in a baking dish.  Salt and pepper those bad boys.  Dump the apple concoction on top.  Toss in some chunks of butter.  Pour in the balsamic vinegar (about 1/3 cup) but making sure that the apples are saturated and that there is some liquid in the bottom of the dish.
photo 2.JPG
Toss in the oven for about 30 mins.  Use a meat thermometer to determine if it's done or not.  I think you can get worms or something from raw pork...gross.
photo.JPG

Friday, September 20, 2013

Roasting a Chicken and Making Some Stock


Do you find yourself at Fred Meyer much more frequently than you should? Have you started referring to it as just "Fred's," like you're going to your friends house? Is this just a problem Alexis and I have? Will Jasper's 1st birthday be in the Starbucks seating area of the Greenwood store? I wonder.
Anyhoo... I was wandering around like a vagabond the other day when I decided to buy a whole chicken. Impulse buy. It sat in the fridge until I thought, shit, that thing is going to go bad! I better cook it! That was at 7:30 on a school night. Not recommended. It turned out pretty good for my first roasted chicken (I've done a turkey before and I'm thinking that story will make a November debut on my other blog...)
So here is what I made up from my minimal experiences with catching turkeys and ovens on fire.

Sesame Roasted Chicken
You will need:
Whole chicken
Sesame oil
Sesame seeds
Meat thermometer 
Corningware (you really need a roasting pan, but this huge ass Corningware that Chris Galloway gave me was perfect)
Pepper

So, take all the gross shit out if the inside of the chicken. Rinse it out and then pat it dry. There was a whole bunch of fat hanging down from the chicken's "bottom", I cut that off. Plop the bird into a pan. Flip its' wings behind its' head.
Now, you're going to stick your hand in between the chicken skin and meat on its breasts. Don't get too excited, it's actually pretty gross.
Once it's separated, take some sesame oil and spread it on the meat under the skin.

Spread some all over the outside of the bird too. Next, grab some sesame seeds and sprinkle them on the chicken. Crack some pepper over it and put it in the oven at 375F for about 1 and a half hours (thermometer should read 180),
Look at that beautiful bird!

Now, it's almost 11. Stick that thing in the fridge and go to bed. When you wake up in the AM, check your phone to find out that two staff are sick. Look longingly at the chicken thinking about all the great things you could do with it if you were only a stay at home unwed, childless woman. 
When you get home, pick the chicken. 
Then, realize you do not have a carrot, celery, or an onion. Being the intelligent, multi tasker that you are, throw on your gym clothes and walk to the gym. After working out, stop at QFC and buy the necessary ingredients.
Now, I will share my experience: as I checked out at QFC, the checker told me to have a great night. I exited and was literally drenched in water. Like, I looked like I got sprayed with a hose. God had decided to create some sort of freak storm system that lasted for only the entirety of my venturing outside of my house. Not to worry, I'll just walk a mile up hill in my wet socks since I'm all sweaty anyway. 
So, here is how to make chicken stock from your chicken carcass.
You need:
A chicken carcass 
Garlic
Pepper
2 bay leaves
Thyme
Basil
1 Onion
1 Carrot
2 stalks of Celery
6 cups of water


Put all if this shit in a pot (chop it up first), if I didn't give you a measurement just shake until it looks right.
Bring it to a boil. Cover it, turn down the heat to medium low, and go take a shower. In about 2 hours, turn it off and drain it into a bowl.
 Let it sit for about 30 minutes then transfer into jars for storage. 

Done and done.